
How to Use Free Lomo Effect Maker to Add Lomo Effects
Lomo Photography or Lomography is very popular in recent years. To make your photos have some cool lomo effects, you do no need a very nice camera or paid lomo effect photo editor at all. Here in this Funny Photo Maker Artistic Photo Effects tutorial, we’re going show how to add lomo effects to your photos. You will see Funny Photo Maker is not just a funny photo editor but also a very good lomo effect maker. This lomography effect tutorial will be suitable for people at all levels. Funny Photo Maker is such a handy lomography effect generator that everyone can intuitively know how to add lomography effects to their photos without knows any photo editing skills.
There are many lomo effects in Funny Photo Maker. Want to see what are the lomo effects? Why not click the lomo effect software free download link below to see all the lomo effects yourself?
>> Free download the free lomo effect photo editor Funny Photo Maker
Below are the original photo and the photo with the classic lomo effect added by our free lomo effect photo editor Funny Photo Maker.


Let’s get started!
Step 1. Import your photos to the free lomo effect maker Funny Photo Maker
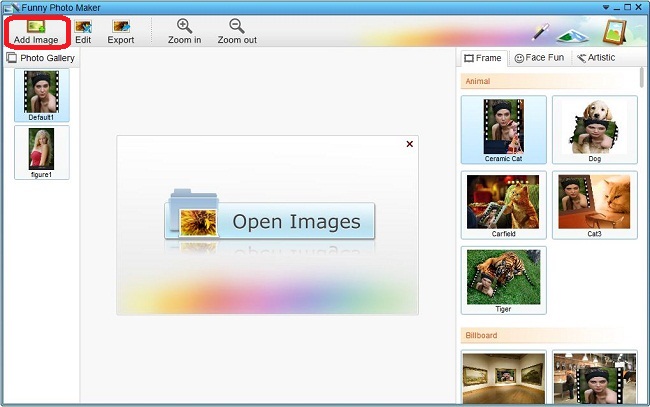
Run Funny Photo Maker, the screenshot below shows the first interface of this free lomo effect software. From the screenshot below, you can easily figure out how to import photos to this free lomo effect maker. As you see in the screenshot below, you can click the "Open Images" message and you can also click the "Add Image" button to add your photos to the free lomo effect maker. The "Add Image" button is marked with a red box in the screenshot, you can use this button to add your photos whenever you want. But the "Open Images" message only shows after you run Funny Photo Maker, it will disappear after you add the first photos.
Step 2. Find, choose and apply lomo effects to your photos
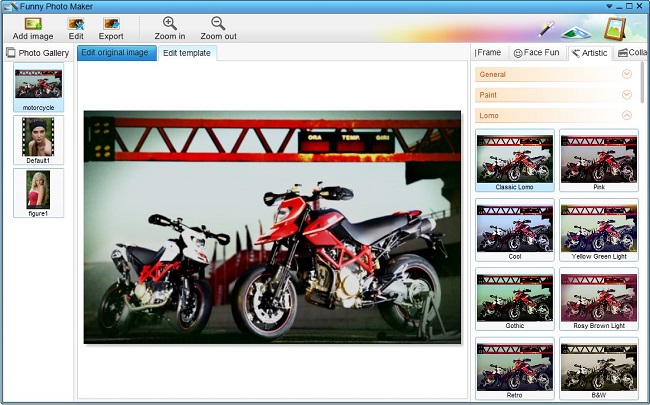
Funny Photo Maker provides four kinds of funny photo templates since version 2.4.0. The first kind is Frame. You can use the funny photo templates from Frame to put your photos in various funny frames. The second kind is Face Fun, or say face in hole templates. The Face Fun funny photo templates can replace the face of an animal or a superstar with your own face. The third kind is Artistic, with photo effects in Artistic, you can easily turn your photos into artwork. The fourth kind is Collage. The lomo effects are in Artistic, to find the lomo effects, you need click Artistic first, and then scroll your mouse to the sub-category Lomo.
As we mentioned in the beginning, there are many lomo effects in Funny Photo Maker. You can see the lomo effects after you open the sub-category Lomo. With just a click on any of the lomo effects, the preview window will show your photo with lomo effects.
Step 3. Export the lomo effect photos
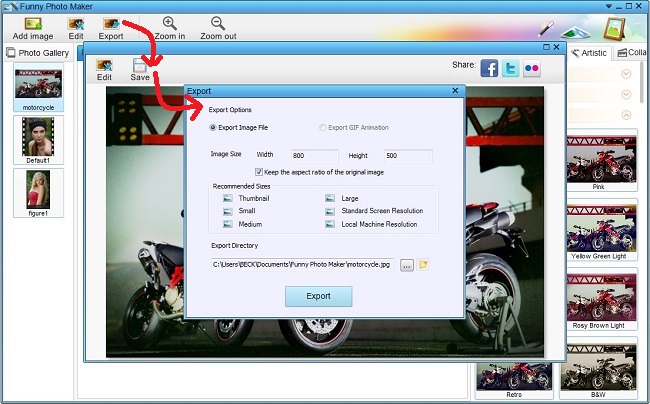
After you choose the lomo effect you like, you can start exporting your photos by clicking the "Export" button. A new window will open after you click the "Export" button. You can choose "Edit", "Save", and "Share" in this window. "Edit" button will bring you to the editor which can add text and clips to your photos, "Save" will bring you to the final step for exporting and the "Share" is for sharing your lomo effect photos to Facebook, Twitter, and Flicker. The following screenshot is the interface after we click "Save".
You see, adding lomo effects to photos with Funny Photo Maker do not need any photo editing skills at all. All the steps can be done with clicks in seconds. Funny Photo Maker is freeware, it can help you add cool lomo effects to your photos with just a few clicks, and it has many more very well and funny functions, there is no reason not to have a try.